
To calculate your roof pitch or slope, enter the following details given below:
Roof Pitch Calculator with Graph
Click any entry to restore values.
- No calculations yet.
Quick Navigation:
What Is Roof Pitch?
If you have ever looked at a house and wondered why some roofs look almost flat while others look like they could double as a ski slope, you’re already thinking about roof pitch even if you didn’t have a name for it.
Roof pitch is simply a measurement of how steep a roof is. More precisely, it describes how many inches a roof rises vertically for every 12 inches it travels horizontally. So a roof that rises 6 inches for every 12 inches of horizontal distance has a pitch of 6:12.
Roof Slope vs Roof Pitch
People often use “roof pitch” and “roof slope” interchangeably, and in everyday conversation fits usually fine. But technically, there is a small difference between these two, and it’s worth knowing.
- Roof pitch is traditionally expressed as a ratio of rise to a fixed run of 12. For example, a 6:12 pitch means 6 inches of rise per 12 inches of run. This is a format for ratio, like n:12. Roofers and carpenters usually use it. They find it very practical when they are working on a job site.
- Roof slope is usually expressed as a percentage or a decimal. So if a 6:12 pitch translates to a slope of 50%, because 6 divided by 12 equals 0.5 or 50%. People often use slope percentages in things like engineering and drainage design. They also use them in building codes when they talk about surface gradients. This is because slope percentages are a way to describe how steep something is, like a road or a roof. Slope percentages are used to make sure things are safe and work properly.
Both express the same thing how steep the roof is but in different method.
Standard Roof Pitches
Not every roof pitch is created equal, The construction industry has developed standard roof pitches which architects use for specific climate conditions, building types and architectural designs.
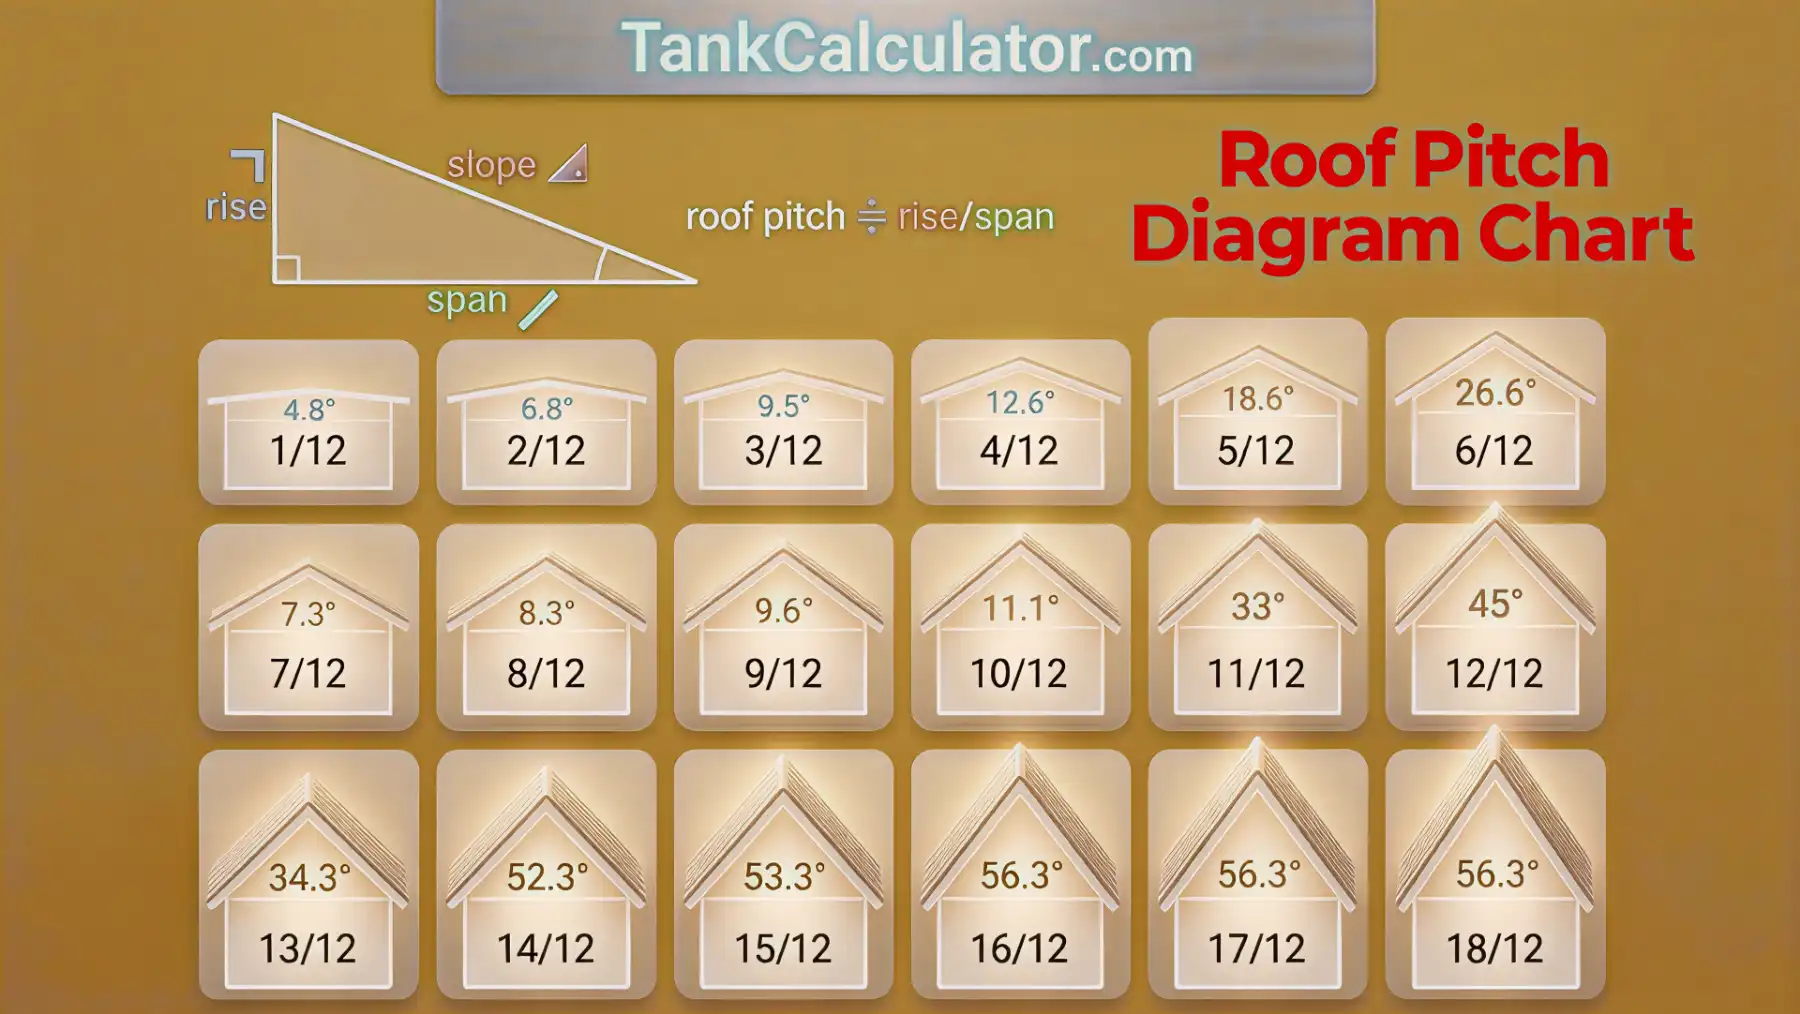
Below are some common roof pitches that are typically used:
Low Slope Roofs (1:12 to 3:12)
These are sometimes called “flat roofs,” though they’re never truly flat they always have some pitch to allow drainage. Pitches in the 1:12 to 3:12 range are common on commercial buildings, sheds, and modern homes with a flat-roof aesthetic.
Common Pitches (4:12 to 9:12)
The majority of home building projects reach their ideal construction stage at this particular location. The roof pitches between 4:12 to 9:12 degrees provide effective drainage which enables full installation of asphalt shingles and all other roofing products while offering safe working conditions for construction staff.
This is the sweet spot for most residential construction. Pitches in this range drain well, accept asphalt shingles and most other roofing materials, and are relatively safe to work on. The 6:12 pitch is probably the most classic residential roof pitch it looks balanced on most house designs and performs reliably across a wide range of climates.
Steep Pitches (10:12 and Above)
Anything above 9:12 or 10:12 are called Steep roofs they are typically found on historic homes, Gothic or Tudor architectural styles, and in regions with very heavy snowfall where steep roofs help shed snow naturally. They require extra safety precautions for workers and use significantly more roofing material.
The table below is for reference of typical roof pitches:
| Pitch (n:12) | Slope % | Angle (°) | Slope Factor | Category |
|---|---|---|---|---|
| 1:12 | 8.33% | 4.76° | 1.003 | Low / Flat |
| 2:12 | 16.67% | 9.46° | 1.014 | Low |
| 3:12 | 25.00% | 14.04° | 1.031 | Low |
| 4:12 | 33.33% | 18.43° | 1.054 | Moderate |
| 5:12 | 41.67% | 22.62° | 1.083 | Moderate |
| 6:12 | 50.00% | 26.57° | 1.118 | Standard |
| 7:12 | 58.33% | 30.26° | 1.158 | Standard |
| 8:12 | 66.67% | 33.69° | 1.202 | Standard |
| 9:12 | 75.00% | 36.87° | 1.250 | Steep |
| 10:12 | 83.33% | 39.81° | 1.302 | Steep |
| 11:12 | 91.67% | 42.51° | 1.357 | Steep |
| 12:12 | 100.00% | 45.00° | 1.414 | Steep (Equal) |
How to Measure Roof Pitch
Most homeowners can measure roof pitch themselves which they need for roof projects or contractor estimates or their own personal interest. The two measurement techniques provide different methods which allow users to choose between climbing up to the roof or staying on the ground.
Method 1: Measuring from the Attic (Easiest and Most Accurate)
If you have attic access, this is the simplest and safest method. You’ll need a level that’s at least 12 inches long and a tape measure.
- 1. Go into your attic and find a rafter (the angled wooden beam that forms the slope of the roof).
- 2. Hold your level horizontally against the underside of the rafter, with one end touching the wood.
- 3. Make sure the bubble in the level is centered you need a true horizontal.
- 4. Measure 12 inches along the level from where it touches the rafter, then measure straight up from that point to the rafter above.
- 5. That vertical measurement (in inches) is your rise and since your horizontal measurement was 12 inches, your pitch is rise:12.
So if you measure 7 inches up, your roof pitch is 7:12. Simple.
Method 2: Measuring on the Roof
You might directly measure the pitch from the roof surface if you have the safety gear. Use the same technique a 12-inch level held against the roof surface, then measure the rise from the 12-inch mark up to the roof. This gives you the same rise:12 result.
Method 3: Measuring Roof Pitch from the Ground
In case don’t want to climb up all. You can figure out the pitch from the ground using a bit of geometry. This way is not as exact though. To do this you will need to measure or guess the height of the roof ridge above the ceiling and the horizontal run. The horizontal run is half the width of the building, for a simple gable roof. You can use the roof ridge and the horizontal run of the roof to estimate the pitch of the roof.
Once you have an approximate rise and run, divide rise by run and multiply by 12 to get the pitch ratio. Or just plug those numbers into a Roof Pitch Calculator and it’ll do the math instantly, also giving you the angle, slope percentage, and rafter length.
Method 4: Using a Speed Square or Digital Angle Finder
Roofers and carpenters often use a speed square or a digital angle finder placed directly on the roof surface or rafter to read the pitch angle in degrees. You can then convert that angle to a standard pitch ratio using the formula: n = 12 × tan(angle°). Again, a Roof Pitch Calculator handles this conversion automatically.
Roof Pitch Formula
The roof pitch calculation can be understood by anyone who has basic math skills. The formulas behind it are straightforward all built on basic geometry and trigonometry.
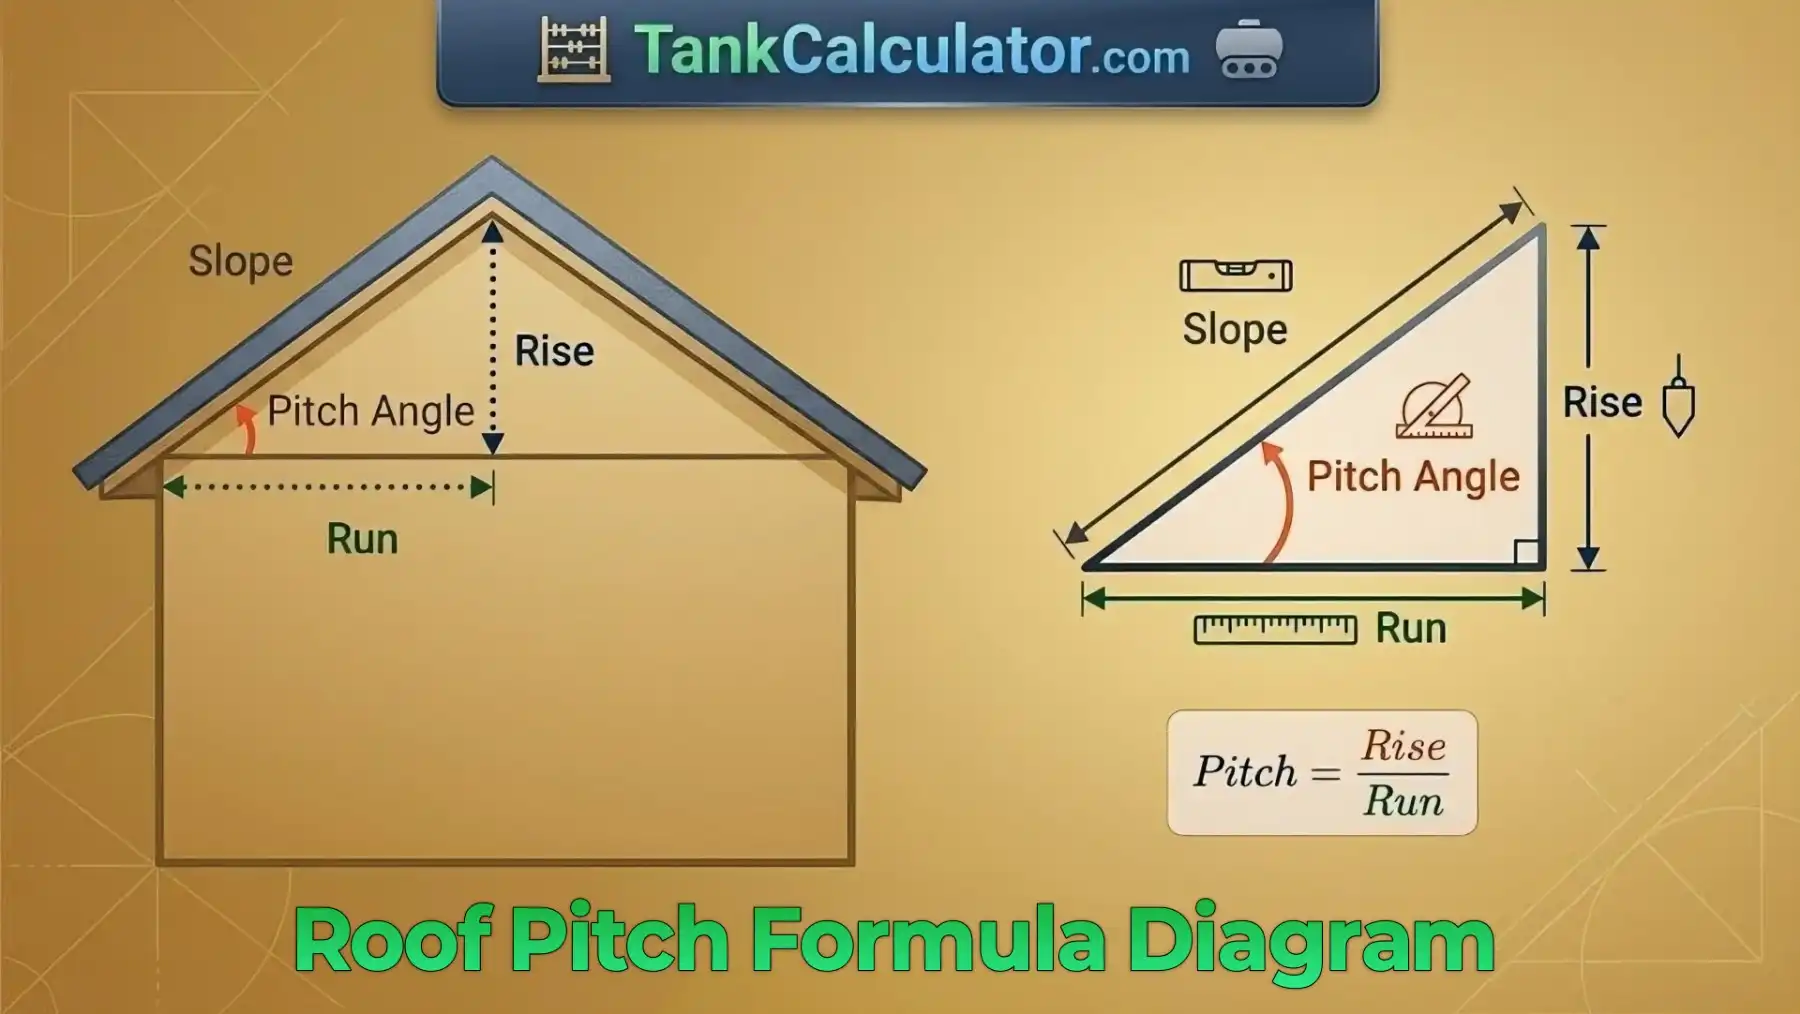
Below are some formulas used in roof pitch calculation:
Meaning of terms used in roof pitch formula:
- Pitch: Describes how steep a roof is.
- Rise: The vertical height the roof goes up.
- Run: The horizontal distance the roof covers.
- Rafter: The sloping structural beam that supports the roof.
Core Pitch and Slope Formulas
Pitch (n:12) = (Rise ÷ Run) × 12
This gives you the standard roofing expression. If your roof rises 6 feet for every 12 feet of horizontal run, your pitch is 6:12.
Slope % = (Rise ÷ Run) × 100
Same idea, just expressed as a percentage instead of a ratio. A 6:12 pitch equals a 50% slope.
Slope Decimal = Rise ÷ Run
The simplest form just the ratio of rise to run. This is often called the “slope factor” and is used in area calculations.
Angle Formula (Degrees)
Angle (°) = arctan(Rise ÷ Run) × (180 ÷ π)
This converts the slope ratio into degrees using the inverse tangent (arctan) function. A 6:12 pitch works out to about 26.57°. You’ll need this for carpenter work, safety assessments, and building permits that require angles instead of ratios. It helps make measurements more accurate and the process much easier.
Rafter Length Formula The Pythagorean Theorem
Rafter Length = √(Rise² + Run²)
The rafter is the hypotenuse of the right triangle formed by the rise and run. This is a direct application of the Pythagorean theorem (a² + b² = c²), where rise and run are the two legs and the rafter is the hypotenuse.
- For a roof with a 6-foot rise and a 12-foot run, the rafter length would be √(36 + 144) = √180 ≈ 13.42 feet.
Knowing the rafter length is really important for ordering lumber figuring out the price of projects and cutting the rafters accurately. The rafter length is essential for ordering the lumber and, for pricing the projects correctly.
Slope Factor Formula
Slope Factor = Rafter ÷ Run
The slope factor tells you how much longer the roof surface is compared to its footprint. A slope factor of 1.118 (which corresponds to a 6:12 pitch) means your actual roof surface area is 11.8% larger than the plan area of the building.
Doing this by multiplying the area of your plan by the slope factor. This gives you the surface area of your roof.
The true roof surface area is what you need to know when you are calculating materials for your roof.
How to Use TankCalculator’s Roof Pitch Calculator
Using the Roof Pitch Calculator is straightforward
- 1. Choose the mode that matches your task: Standard, Reverse, Materials, or Carpenter.
- 2. Enter the known values in the input fields. In the Standard tab, you only need two values to calculate everything else.
- 3. Select your preferred decimal precision and unit feet, inches, meters, centimeters, or millimeters.
- 4. Click the “Calculate Button” This will provide you with an immediate answer after you click it.
You can copy the results, print them, export as CSV, or switch to the History section to reload any previous calculation.
Calculation Modes in TankCalculator’s Roof Pitch Calculator
Our calculator works on specialized modes, each for different aspect of roof pitch work:
- Standard: Enter any two values (rise, run, pitch, angle, or rafter length) and instantly calculate all remaining values.
- Reverse: Input your target pitch and one known dimension to compute the missing rise or run. This is useful when you are designing something and you have a pitch, in mind rather than trying to match the pitch of something that already exists. You can use this method when you want to create something from a desired pitch, of measuring the pitch of an existing thing.
- Materials & Cost: Calculate roof surface area, roofing squares, shingle bundles, waste allowance, and estimated material cost.
- Carpenter Tools: Get exact rafter cut angles (plumb cut, seat/bird’s mouth, ridge cut, and cheek miter) plus overhang adjustments. Includes a printable cutting template diagram.
About This Roof Pitch Calculator
Our Roof Pitch Calculator is a complete, all-in-one RPC we create this to handle every common roofing calculation quickly and accurately. Whether you need to find the slope from rise and run, work backwards from a desired pitch, estimate material quantities and costs, or get precise rafter cut angles for carpenters, the calculator handles it all in one place.
This thing is really helpful because it works with lots of units like feet and inches and meters and centimeters and millimeters. It can automatically change from one unit to another. You can also decide how decimal places you want to see. It even has a graph that shows the roof pitch, which is really good for understanding things visually with diagrams.
Key Features of this Calculator
- Multiple calculation modes in one place
- Live roof and rafter diagrams (Graph)
- Support for feet, inches, meters, centimeters, and millimeters
- Decimal precision control the user can set the decimal accuracy like: 2, 4, or 6 decimal places according to their requirements.
- Built-in safety warnings for low-slope and steep-slope conditions
- Materials estimator with waste percentage and cost calculation
- Precise carpenter cut angles with visual cutting template
- Calculation history the system provides immediate access to all past calculations which users can retrieve without needing to type their information again.
- Export users can save their results as CSV files which they can use for record keeping or spreadsheet work.
Benefits of This Calculator
Roofers and contractors are really going to like the fact that they can get material estimates away and cut angles that are exact. Roofers and contractors will be able to work quickly because of this.
Carpenters get exact miter and plumb angles without pulling out a calculator. DIY homeowners can finally understand what their contractor is talking about when they say “6:12 pitch” and they can verify estimates themselves.
The diagrams and formula panel help beginners understand what the numbers mean. The export and multi-unit support make it useful for professionals who need to record and share results, with Roof Pitch Calculator.
Our Roof Pitch Calculator saves a lot of time. It eliminates guesswork. This makes every roofing project go smoothly.
Frequently Asked Questions (FAQ)
Which roof is best for a house?
For homes a gable roof or hip roof is a popular choice. Gable roofs are easy and inexpensive to build. They provide good space for storage in the attic. Hip roofs are stronger and more stable in winds and they look elegant but they are more costly. In areas with a lot of snow steeper roof pitches are preferred because they help snow to slide off. The best roof, for your house depends on where you live how much you can spend and the style of your house. A gable roof or a hip roof can work well it all depends on your needs and preferences.
What is a 4 sided roof called?
A hip roof is a roof with four sides. It is different from a roof. A gable roof has two sides that slope and two ends that are shaped like triangles. A hip roof has four sides that all slope. They meet at the top to form a shape that looks like a pyramid on buildings. On buildings that’re not square the shape is more complicated. Hip roofs are very strong. They can resist the wind well.
What are the 8 components of a roof?
Every roof consists the 8 main components:
1. Rafters: The structural beams that support the roof.
2. Trusses: Prefabricated triangular frames (used in modern homes).
3. Sheathing (roof deck): The plywood or OSB layer over the rafters.
4. Underlayment: This material placed under the shingles for waterproofing.
5. Roofing material: Shingles, metal, tiles, or membrane.
6. Flashing: Metal pieces that prevent water from entering around chimneys, vents, and valleys.
7. Ridge vent or Soffit vents: Allow proper attic ventilation.
8. Gutters and downspouts: Channel rainwater away from the house.
What is the most expensive part of replacing a roof?
When you get a roof the thing that costs the most is usually the people who do the work. This is what we call labor cost. The materials for the roof are also very expensive. For roofs that have asphalt shingles the labor cost is usually fifty to seventy percent of the cost.
Other things that can cost a lot of money include taking off the roof and getting rid of it. This is especially true if there are layers that need to be removed. If the people working on the roof find any problems with the structure of the roof that can cost a lot of money to fix too. The cost of labor and the cost of materials, like asphalt shingles can really add up when you are getting a roof.
What is the cheapest option for a new roof?
Asphalt shingles are the affordable option for most people who own a home. Asphalt shingles, like the 3-tab shingles are easy to find and do not cost a lot to put on a house. They are also pretty simple to install.
Asphalt shingles cost a lot less than materials like metal or tile or slate or synthetic things. Asphalt shingles do not last long as really good materials, which is usually around 15 to 25 years.. For people who do not want to spend a lot of money asphalt shingles are a good choice because they work well and do not cost too much. Asphalt shingles are a choice, for people who want to save money on their roofing project and still get a good roof.